Example workflow
The retrieval of input files and running the workflow locally and on a server cluster via a queuing system is demonstrated using an example with data available from NCBI.
This dataset is available under the accession number PRJNA379630.
Note
In this tutorial, we will show the basic functionalities of our workflow, for information about additional options please refer to: workflow-configuration.
Note
Ensure that you have miniconda3 or miniforge3 installed and a snakemake environment set-up. Please refer to the overview for details on the installation.
Setup
First of all, we start by creating the project directory and changing to it.
mkdir project
cd project
We then download the latest version of HRIBO into the newly created project folder and unpack it.
wget https://github.com/RickGelhausen/HRIBO/archive/1.8.0.tar.gz
tar -xzf 1.8.0.tar.gz; mv HRIBO-1.8.0 HRIBO; rm 1.8.0.tar.gz;
Retrieve and prepare input files
Before starting the workflow, we have to acquire and prepare several input files. These files are the annotation file, the genome file, the fastq files, the configuration file and the sample sheet.
Annotation and genome files
First, we want to retrieve the annotation file and the genome file. In this case, we can find both on NCBI using the accession number NC_002516.2.
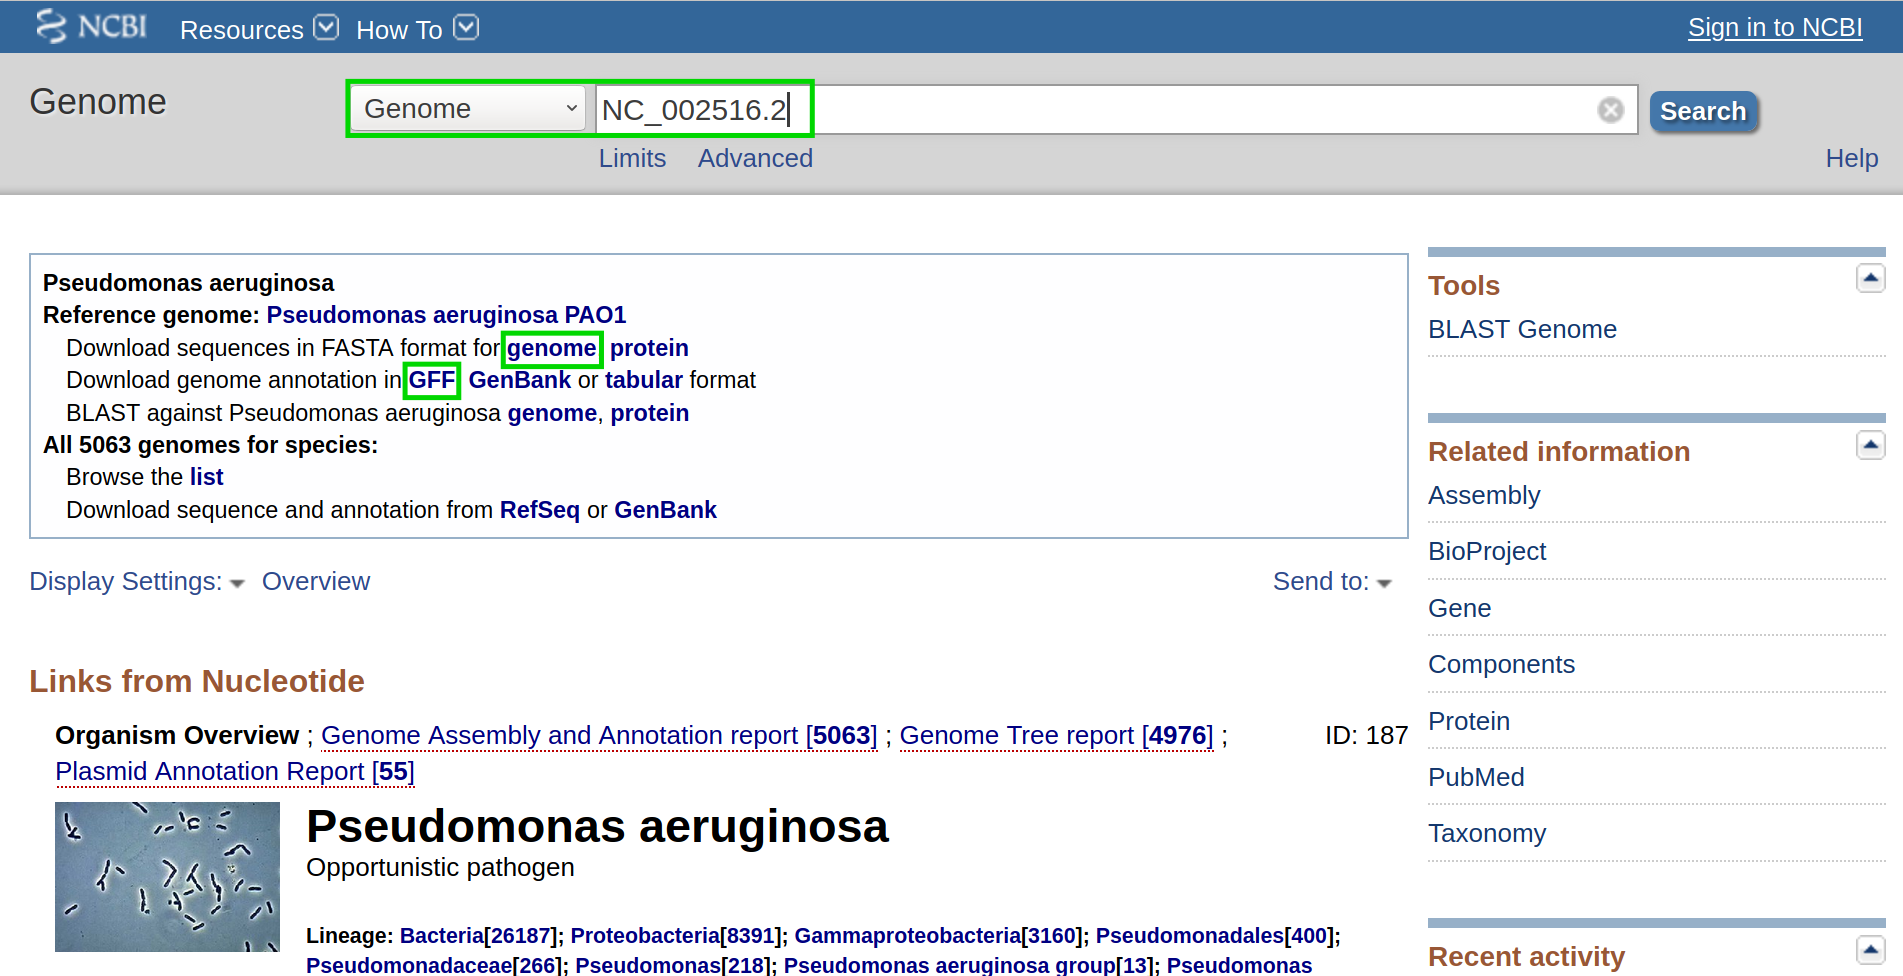
On this page, we can directly retrieve both files by clicking on the according download links next to the file descriptions. Alternatively, you can directly download them using the following commands:
wget ftp://ftp.ncbi.nlm.nih.gov/genomes/all/GCF/000/006/765/GCF_000006765.1_ASM676v1/GCF_000006765.1_ASM676v1_genomic.gff.gz
wget ftp://ftp.ncbi.nlm.nih.gov/genomes/all/GCF/000/006/765/GCF_000006765.1_ASM676v1/GCF_000006765.1_ASM676v1_genomic.fna.gz
Then, we unpack and rename both files.
gunzip GCF_000006765.1_ASM676v1_genomic.gff.gz && mv GCF_000006765.1_ASM676v1_genomic.gff annotation.gff
gunzip GCF_000006765.1_ASM676v1_genomic.fna.gz && mv GCF_000006765.1_ASM676v1_genomic.fna genome.fa
.fastq files
Next, we want to acquire the fastq files. The fastq files are available under the accession number PRJNA379630 on NCBI.
The files have to be downloaded using the Sequence Read Archive (SRA).
There are multiple ways of downloading files from SRA as explained here.
As we already have conda installed, the easiest way is to install the sra-tools:
conda create -n sra-tools -c bioconda -c conda-forge sra-tools pigz
This will create a conda environment containing the sra-tools. Using these, we can simply pass the SRA identifiers and download the data:
conda activate sra-tools;
fasterq-dump SRR5356907; pigz -p 2 SRR5356907.fastq; mv SRR5356907.fastq.gz RIBO-PAO1-gly-1.fastq.gz;
fasterq-dump SRR5356908; pigz -p 2 SRR5356908.fastq; mv SRR5356908.fastq.gz RNA-PAO1-gly-1.fastq.gz;
conda deactivate;
Note
Due to the runtime of several tools, especially the mapping by segemehl, this tutorial only uses one condition and replicate. If available, it is advisable to use as many replicates as possible.
Warning
If you have a bad internet connection, this step might take some time. If you prefer, you can also use your own .fastq files. But ensure that you use the correct annotation and genome files and that you compress them in .gz format (using gzip, pigz, etc …)
This will download compressed files for each of the required .fastq files. We will move them into a folder called fastq.
mkdir fastq;
mv *.fastq.gz fastq;
Sample sheet and configuration file
Finally, we will prepare the configuration file (config.yaml) and the sample sheet (samples.tsv). We start by copying templates for both files from the HRIBO/templates/ into the HRIBO/ folder.
cp HRIBO/templates/samples.tsv HRIBO/
The sample file looks as follows:
method |
condition |
replicate |
fastqFile |
fastqFile2 |
|---|---|---|---|---|
RIBO |
A |
1 |
fastq/RIBO-A-1.fastq.gz |
|
RIBO |
A |
2 |
fastq/RIBO-A-2.fastq.gz |
|
RIBO |
B |
1 |
fastq/RIBO-B-1.fastq.gz |
|
RIBO |
B |
2 |
fastq/RIBO-B-2.fastq.gz |
|
RNA |
A |
1 |
fastq/RNA-A-1.fastq.gz |
|
RNA |
A |
2 |
fastq/RNA-A-2.fastq.gz |
|
RNA |
B |
1 |
fastq/RNA-B-1.fastq.gz |
|
RNA |
B |
2 |
fastq/RNA-B-2.fastq.gz |
Note
When using your own data, use any editor (vi(m), gedit, nano, atom, …) to customize the sample sheet.
Warning
Please ensure not to replace any tabulator symbols with spaces while changing this file.
We will rewrite this file to fit the previously downloaded .fastq.gz files.
method |
condition |
replicate |
fastqFile |
fastqFile2 |
|---|---|---|---|---|
RIBO |
GLY |
1 |
fastq/RIBO-PAO1-gly-1.fastq.gz |
|
RNA |
GLY |
1 |
fastq/RNA-PAO1-gly-1.fastq.gz |
Next, we are going to set up the config.yaml.
cp HRIBO/templates/config.yaml HRIBO/
The config file can be used to easily change the parameters of HRIBO.
Note
For a detailed overview of the available options please refer to our workflow-configuration
In our small example, we will adjust the adapter sequence and to reduce the runtime, deactivate deepribo, which will lead to the following changes in the config.yaml file:
biologySettings:
    # Adapter sequence used
    adapterS3: "AGATCGGAAGAGCACACGTCTGAACTCCAGTCAC"

predictionSettings:
    # Deepribo predictions: on / off
    deepribo: "off"
Running the workflow
Now that all the required files are prepared, we can start running the workflow, either locally or in a cluster environment.
Warning
before you start using snakemake remember to activate the environment first.
conda activate hribo_env
Run the workflow locally
Use the following steps when you plan to execute the workflow on a single server, cloud instance or workstation.
Warning
Please be aware that some steps of the workflow require a lot of memory or time, depending on the size of your input data. To get a better idea about the memory consumption, you can have a look at the provided sge.yaml or torque.yaml files.
Navigate to the project folder containing your annotation and genome files, as well as the HRIBO folder. Start the workflow locally from this folder by running:
snakemake --use-conda -s HRIBO/Snakefile --directory ${PWD} -j 10 --latency-wait 60
This will start the workflow locally.
--use-conda: instruct snakemake to download tool dependencies from conda.-s: specifies the Snakefile to be used.--directory: specifies your current path.-j: specifies the maximum number of cores snakemake is allowed to use.--latency-wait: specifies how long (in seconds) snakemake will wait for filesystem latencies until declaring a file to be missing.
Run Snakemake in a cluster environment
Use the following steps if you are executing the workflow via a queuing system. Edit the configuration file <cluster>.yaml
according to your queuing system setup and cluster hardware.
Navigate to the project folder on your cluster system. Start the workflow from this folder by running (The following system call shows the usage with Grid Engine.):
snakemake --use-conda -s HRIBO/Snakefile --directory ${PWD} -j 5 --cluster-config HRIBO/sge.yaml
Note
Ensure that you use an appropriate <cluster>.yaml for your cluster system. We provide one for SGE and TORQUE based systems.
Example: Run Snakemake in a cluster environment
Warning
Be advised that this is a specific example, the required options may change depending on your system.
We ran the tutorial workflow in a cluster environment, specifically a TORQUE cluster environment.
Therefore, we created a bash script torque.sh in our project folder.
vi torque.sh
Note
Please note that all arguments enclosed in <> have to be customized. This script will only work if your cluster uses the TORQUE queuing system.
We proceeded by writing the queuing script:
#!/bin/bash
#PBS -N <ProjectName>
#PBS -S /bin/bash
#PBS -q "long"
#PBS -d <PATH/ProjectFolder>
#PBS -l nodes=1:ppn=1
#PBS -o <PATH/ProjectFolder>
#PBS -j oe
cd <PATH/ProjectFolder>
source activate HRIBO
snakemake --latency-wait 600 --use-conda -s HRIBO/Snakefile --directory ${PWD} -j 20 --cluster-config HRIBO/torque.yaml --cluster "qsub -N {cluster.jobname} -S /bin/bash -q {cluster.qname} -d <PATH/ProjectFolder> -l {cluster.resources} -o {cluster.logoutputdir} -j oe"
We then simply submitted this job to the cluster:
qsub torque.sh
Using any of the presented methods, this will run the workflow on the tutorial dataset and create the desired output files.
Results
The last step will be to aggregate all the results once the workflow has finished running.
In order to do this, we provided a script in the scripts folder of HRIBO called makereport.sh.
bash HRIBO/scripts/makereport.sh <reportname_prefix>
Running this command will create a folder where all the results are collected from the workflows final output, it will additionally create compressed file in .zip format.
Note
A detailed explanation of the result files can be found in the result section.
Note
The final result of this example workflow, can be found here .
Warning
As many browsers stopped the support for viewing ftp files, you might have to use a ftp viewer instead.
Runtime
The total runtime of the example workflow, using 12 cores of an AMD EPYC Processor (with IBPB), 1996 MHz CPUs and 64 GB RAM, was 4h04m37s.
The runtime contains the automatic download and installation time of all dependencies by conda and singularity. This step is mainly dependent on the available network bandwidth. In our case it took about 7 minutes.
References
- GruningDSjodin+17
Björn Grüning, Ryan Dale, Andreas Sjödin, Jillian Rowe, Brad A. Chapman, Christopher H. Tomkins-Tinch, Renan Valieris, and Johannes Köster. Bioconda: a sustainable and comprehensive software distribution for the life sciences. bioRxiv, 2017. URL: https://www.biorxiv.org/content/early/2017/10/27/207092, arXiv:https://www.biorxiv.org/content/early/2017/10/27/207092.full.pdf, doi:10.1101/207092.
- KosterR18
Johannes Köster and Sven Rahmann. Snakemake—a scalable bioinformatics workflow engine. Bioinformatics, ():bty350, 2018. URL: http://dx.doi.org/10.1093/bioinformatics/bty350, arXiv:/oup/backfile/content_public/journal/bioinformatics/pap/10.1093_bioinformatics_bty350/2/bty350.pdf, doi:10.1093/bioinformatics/bty350.
- PGAR19
Anastasia H. Potts, Yinping Guo, Brian M. M. Ahmer, and Tony Romeo. Role of csra in stress responses and metabolism important for salmonella virulence revealed by integrated transcriptomics. PLOS ONE, 14(1):1–30, 01 2019. URL: https://doi.org/10.1371/journal.pone.0211430, doi:10.1371/journal.pone.0211430.
- ZAA+18
Daniel R Zerbino, Premanand Achuthan, Wasiu Akanni, M Ridwan Amode, Daniel Barrell, Jyothish Bhai, Konstantinos Billis, Carla Cummins, Astrid Gall, Carlos García Girón, Laurent Gil, Leo Gordon, Leanne Haggerty, Erin Haskell, Thibaut Hourlier, Osagie G Izuogu, Sophie H Janacek, Thomas Juettemann, Jimmy Kiang To, Matthew R Laird, Ilias Lavidas, Zhicheng Liu, Jane E Loveland, Thomas Maurel, William McLaren, Benjamin Moore, Jonathan Mudge, Daniel N Murphy, Victoria Newman, Michael Nuhn, Denye Ogeh, Chuang Kee Ong, Anne Parker, Mateus Patricio, Harpreet Singh Riat, Helen Schuilenburg, Dan Sheppard, Helen Sparrow, Kieron Taylor, Anja Thormann, Alessandro Vullo, Brandon Walts, Amonida Zadissa, Adam Frankish, Sarah E Hunt, Myrto Kostadima, Nicholas Langridge, Fergal J Martin, Matthieu Muffato, Emily Perry, Magali Ruffier, Dan M Staines, Stephen J Trevanion, Bronwen L Aken, Fiona Cunningham, Andrew Yates, and Paul Flicek. Ensembl 2018. Nucleic Acids Research, 46(D1):D754–D761, 2018. URL: http://dx.doi.org/10.1093/nar/gkx1098, arXiv:/oup/backfile/content_public/journal/nar/46/d1/10.1093_nar_gkx1098/2/gkx1098.pdf, doi:10.1093/nar/gkx1098.